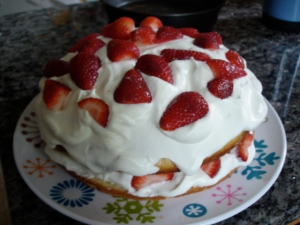
Strawberry Wonder

This, folks, is a pile of heaven.  It’s essentially a giant strawberry shortcake, but with a spongy vanilla cake, homemade whipped cream, and a quart of sliced berries.  Mmm.  I bet it’d be good with peaches, too, later this summer, or any other ripe fruit you have, like raspberries.  Mm, mm, that would be good.

Oh, and hi.  It’s been about six months.

The cake underneath the mountain of whipped cream here is a riff on Orangette’s yogurt cake, which you can find here:  orangette.blogspot.com/2004/08/slow-roasting.htm.  It’s a nice, easy recipe using ‘jar’ measurements like the French–each jar is about 1/2c.  It’s a recipe that’s endlessly variable, which turned out to be a very good thing for me.

My plan was to make the cake, plain and simple, but I had problems from the start. I had to get ingredients first thing in the morning–I popped into Trader Joe’s right after it opened at 8–and they didn’t have a small plain yogurt, and I didn’t have time to go anywhere else.  So I got a vanilla.

I got home and started putting the recipe together without putting much thought into it,  and dumped the whole cup of yogurt into the bowl rather than measuring a half cup jar.  Oops.

I was grateful then that I’ve been baking long enough to be able to have an idea of how to salvage the cake, and I ended up baking a delicious little number.  First, I figured out how much yogurt I’d put in the bowl by filling the cup up with water and dumping that into a measuring cup.  Then, remembering that you can sometimes sub yogurt for oil to cut calories and fat, I altered the amount of oil in the recipe to account for several extra tablespoons of yogurt.  I also cut back the sugar, since the yogurt was sweetened and I didn’t want a terribly sweet cake.  The cake is really variable here because you actually stir the sugar into until it melts–usually sugar, creamed with butter, is what gives structure to a cake by providing something the flour can work with to create air pockets (thank you, Alton Brown–just get to the 8 minute mark and he’ll explain).

I cut the citrus in the original recipe out altogether, added a splash of vanilla extract, and popped the cake into the oven.  When it was done I let it cool, removed it from the pan, and used  a long serrated knife to slice it into two layers.

In the meantime, I beat a pint of whipping cream until it was thick, added 1.5 T of sugar, and beat it until it had gentle peaks.  I slathered some on the bottom cake layer and added a little more than half of my sliced berries.  Then I did it again.

This will last a couple of days in the fridge before it becomes questionable, but I don’t think it stands a chance of making it many days without being eaten.  Yum!  Summer on a plate.

The post in which we start repairing, rather than demolishing, the kitchen

Before...

Today is a very exciting day.

After.

Today, we tore the last pieces of laminate from behind the sink and pulled out the nails that attached the last bits of that awful backsplash to the wall.

Then the new counters went in.  They’re a dark laminate and already the kitchen looks better.  On Friday the walls will be repaired and by Saturday the plumbing should be installed, with a new sink and new faucet.

Then we can start to tile the wall, to paint the other walls, and eventually, come spring, sand, prime and paint the cabinets, replacing the hardware and outfitting it with trim.

We’re on the upswing.  Huzzah!


Pantry Cooking, round 1

I’ve begun doing more pantry cooking, as I noted I would in my last post, over the weekend.  Shopping this week wasn’t as cheap as I anticipated, but that’s because we ran out of toothpaste, TP, and deodorant all at once, and because Stop and Shop had stuff I wanted to stock up on–big cans of Red Pack tomatoes were a buck, as was pasta.  But on Saturday night after much debating I made biscuits and ate two, warm, with eggs and some avocado–the avocado was also a buck at S&S and much of it’s still in the fridge.  Last night I made this dish on the left–not lovely, I know, but quite tasty–Barley Risotto with Mushrooms at Carrots.  The recipe is based on this one at the Splendid Table on NPR, but that original called for dried mushrooms, which I didn’t have, and the broth you get from reconstituting.  I skipped those things and simply used more chicken broth and more cremini mushrooms.

The trickiest part of this recipe was scaling–I had about 3/4 c of pearled barley, not the full cup the recipe called for, so I used a calculator to get the right amount of broth and cheese for the recipe so it wouldn’t be too loose or to bound with cheese.  The rest of the changes I more or less eyeballed.  But it went like this:

3/4 onion, chopped
2 smallish carrots, diced
about 6 oz cremini mushrooms, coarsely chopped
1T olive oil
just over 1 t thyme
3.75 c chicken broth
white wine–about 1/3 c
3/4 c pearled barley
1/3 c parmesan cheese

Start by putting your oil in a big dutch oven or good-size sauce pot over medium heat.  Add onions and carrots and cook about 5 minutes, until softened.  Add mushrooms and a bit of salt and cook, stirring frequently, until they’ve begun to brown and cook down, about 8-10 minutes.  Add wine, thyme and barley and cook, stirring, until wine is nearly gone.  Add 3c of broth, bring to a boil, kick down to a simmer and let cook about 25 minutes, until barley is about tender, stirring often.  Add last bit of broth, stir, let it cook a bit until creamy, and add cheese.  Voila–done.  It doesn’t taste quite like regular risotto, but was lovely and hearty on a not-so-cold winter’s night.  We ate them with biscuits and roasted cabbage slices, care of an aging, wilted cabbage in the fridge that was on its last legs.  Total amount of new ingredients for this dish was only a few bucks, mainly for the 3/4-package of mushrooms and for the cheese, as we’d run out and had to buy more.  It’s something we ordinarily keep in the house but like everything else, it eventually gets eaten.

Now I can cross “1/2 c pearled barley” off my pantry list.  Tonight, mac and cheese with ham (frozen from Christmas) and broccoli (frozen, because I’m lazy).  We had cheese leftover from right after Christmas and already had the pasta, too.  I might need to pick up some milk (pretty unusual in our house), but that’s about it.

Pantry Challenge

Since we have to install new counters (oops) and attach cementboard to the wall over the busted plaster (not my oops, but still), I thought January might be a good time to do some pantry cooking.  We’ll save some money and consume some of the stuff that’s been in the pantry (or lazy susan, in our case) quite some time.  Here’s what we’ve got:

dried beans–black beans and white beans
whole wheat couscous
pasta (I’m about to stock up, since Stop and Shop has it on sale for a buck)
tomatoes (ditto above–Red Pack for $1/can, so I’ll get a dozen this week)
brown rice
brown and wild rice  (not a lot)
white rice  (also not a lot)
arborio rice (probably 3/4 cup)
cornmeal
bean threads
half a box of rice noodles
lentils (red and green)
pearled barley (about 1/2 c)
Flours
sugars
oils

And in the freezer, lots of ham, turkey, the equivalent of a can of chickpeas, 8 oz mozzarella, and some frozen stuff from Trader Joe’s; a bit of frozen mixed veggies and some frozen corn. The fridge is pretty sparse–some clementines, a single onion and some hummus, but also eggs, milk, cheddar, pepperoni.  and a really old cabbage.

So, what would you make?  I’m thinking some kind of soup, macaroni and cheese with ham, and that’s where I get stuck.

Sweet Pea the Destroyer

Isn’t home improvement fun?  I alternately love and hate it.  Today’s a good day, but a few days last week were not.  Last Monday, for example, basking in day-after-Christmas warm and fuzzies, I broke the counter.  Oops.  It has–or, had–a metal trim around the back and I was hoping I could pry it out.  And I did, but it came with nails, which tore up the counter.  This demonstrated to us that we couldn’t simply live with our counter and tile a backsplash as planned, as the splash would be on top of the trim, and might get destroyed or at least be out of proportion to a new counter installed down the road.  So this week I’ve spent calling in counter installers, getting estimates, blah blah blah.

I’ve been working on removing more of the backsplash–fun, isn’t it?  Two days ago I did this while I cranked Motley Crue and stretched out underneath the cabinet with putty knife in hand.  As you can see, I still haven’t gotten at the corner, but my bicep was killing me. 

Today went better, though, as it looks like the huge expanse of backsplash at the far end of our counter was installed in the 80s and mostly pried right off, not bound to old glue and crumbling plaster.  Except for the corner.  Going to have to figure out how to fix that up, but still–I anticipated that black mastic and 80s glue to be everywhere, so finding this out was a relief. Tearing it down around the outlet gave me a chance to use one of the outlet insulators I bought ages ago, since the laminate no longer provides any buffer to wall drafts.

Next up, more of the splash–I can see under the window that there’s plenty of black mastic, and I’ll leave that spot for last, so I can keep using the sink without worrying about water damage since our faucet leaks out of its base.  Don’t worry, it’s on the list of things to be replaced.  I’ll climb under the cabinets again tomorrow and work the laminate in the corner up.  That’s about all we can do before counters are installed, and wall repair/tiling can begin.  Then paint!  Huzzah!

Kitchen “Renovation”

Folks, what a long several  months it’s been.  And also a speedy several months.  I think the last time I posted was in early fall, as school got underway.  The semester has been a very busy one, and then we had the Great Power Outage of 2011.  10 days without electricity in late fall made for a very unpleasant situation and the mister and I lived as nomads for that time.  Now the semester is winding down and we’re starting to decorate our house for Christmas.  I also had the genius plan to start tearing the kitchen apart now, while we have time, before Mr. Pea is back at school and I’m full swing into article edits.  That idea made quality sense, except that this is the prime cooking season at our house, so I’m starting to wonder…I guess I’ll just keep the shop vac handy and clean everything all the time, rather than leave bits of, say, broken laminate, out and about.  This photo is of stage 2.  Mr. Pea’s begun to tear down wallpaper and I’m working on the old backsplash.  It’s icky laminate ca. 1985 and looks to have been glued on top of old glue.  Genius.  My plan is to tear it down, pry up the aluminum trim along the counter, and then sand the glue masses down some for evenness (I can’t get the old black glue off much, and when it does come down, it takes a bunch of plaster with it).  Then I’ll skimcoat it a few times, sand it a bit (that should make a heck of a mess), prime and paint.  Eventually we’ll put up a tile backsplash, as well.  I’m starting a new blog category, “House Projects,” for this kind of stuff.

I’d like to think this won’t take eons, but I suspect–given that there’s 40 square feet of laminate, that it could be a while.  If anyone wants to send us a plaster contractor for Christmas, I won’t turn him/her away!

In the meantime, I hope to make our first batch of cookies today, our favorite mint chocolate guys.  Here’s the link my original post:  https://sweetpeacooks.wordpress.com/2008/12/06/must-have-christmas-cookies/

Corn Cakes with Avocado Salsa

Corn cakes with avocado salsaOne of my lazy summer passions is Pinterest, the website where you can pin (like a digital bulletin board) photos that strike your fancy into category boards.  You can also spend hours browsing the pins of others, and repin those you like.  It probably won’t surprise you that my biggest board is food (surprise, surprise).  I have been trying to do more than passively pin pretty photos of delectable meals but to actually make them (each pin contains a link to the pin’s original site).  This photo (mine) is of a pinned recipe I found for corn cakes with avocado salsa.  They were labor-intensive, but totally worth it, and a great way to enjoy late summer vegetables.

I’m just going to direct you to the original recipe–no sense reinventing that wheel here since I made them just as the original author, Rebecca of the hilariously-named site Ezra Poundcake, instructed.  If you have the time to give (probably an hour) and a food processor, I strongly encourage you to give them a go.

Oops! Catching up with crafts and jam

Pretty Little Folks voileWow, it has been a busy summer.  I don’t know how it is mid-August already.  Between house projects, syllabi, and article editing, the months have really flown by.  I hadn’t crafted in ages until yesterday, though I tend to make a lot of stuff in the summer.

And this is one easy craft, so I’m not sure how much it counts, but I’m taking it, anyway.

Right there is a little pile of voile–super-soft cotton–in the Little Folks line by Anna Maria Horner.  It’s adorable with little houses, trees, deer.  When I saw it on sale at Sew Mama Sew, I thought it was time to buy myself a little something to make myself a little something.

So I made this:
Little Folks infinity scarfIt’s called an infinity scarf.  I know it’s hard to see here, but I take awful self-portraits.  Essentially you make a big tube.  And wrap it around your head.

Here, have a tutorial:  http://thecottagehome.blogspot.com/2011/05/lightweight-spring-infinity-scarf.html

I sort of fudged sewing the short ends together to make the tube, but my sorta ugly seam is well-hidden when I wrap it around my neck.  This whole project took me all of a half an hour, and the payoff was faaaaantastic.

If you like easier projects, I think you should also take a stab at canning.  A lot of people find canning intimidating.  It can be, I suppose–sometimes you have to be fast on your feet and you do spend a lot of time in a warm and humid kitchen.  But the recipe at Food in Jars for this particular jam takes a  lot of the chaos out by making it in the slow cooker.

Blueberry ButterFirst you have to have a LOT of fruit, in order to make 8 cups of puree in your food processor/blender.  I think I used nearly 4.5 pounds of berries.

Then you put them in the cooker with a little sugar and, if you want, some spices.  I didn’t want any–the reason I was trying this recipe is because I wanted a spread (technically this is a butter) with pure blueberry flavor.  My other blueberry jams tend to taste more sweet than blueberry-y.  This recipe uses less sugar and no pectin, and the results were amazing.  It cooks down for several hours and then you process it in a water bath.

Don’t take my word for it–Marisa at Food in Jars has legions of happy commenters on this recipe!

As the summer winds down, I’m planning on making some salsa verde and canning it; we made a half-batch of three pints last year and this year I’ll make a full, as we loved it.  I did make seven pints of sweet pickles that are now in the basement with the cherry jam and this butter.  With the fall I’ll make apple sauce and maybe some vanilla/pear jam in between.  That’s it, though–a leaner canning year, but that’s ok.  I’m hoping to find a cheap chest freezer on craigslist and step up the preserving next summer, or get some tattler lids (bpa free, reusable plastic?  sweet!) and do tomatoes (last year a bunch of my lids got rusty spots on the inside–the tomatoes were probably fine, but it made me nervous).  It’s almost time to start planning Christmas gifts, so the less time I spend over the canning kettle, the more I can spend on that.  And in two weeks, it’ll be time to reunite with my eager students and start another semester.  Wow, the time goes so quickly.

Cherries I Forgot I Photographed

Cherry jamTypically I neglect blogging because I haven’t photographed anything; this time, I forgot I took photos.  Here’s my first canning effort of the season, since I missed the strawberries:  sweet cherry jam.  The cherries are from Washington State, alas, but they were pretty good.  The jam is just the Ball recipe that comes in the pectin package.  Truth be told, I don’t love it–it’s a lot of sweet and a not a great deal of cherry flavor.  Hmm.  Tasty, but not ideal.  But hey, at least we have some jam set aside.  Next up will be blueberries, though the ones I picked last week are already near gone, so I’ll have to get more.  Following that, in short order, will be sweet pickles and tomatillo salsa.  Yum.  But for now, cherries.

Cherry pancakesCherries, I discovered, are actually quite tasty in pancakes.  I suspected they might be, given how awesome cherry clafoutis is.  These pancakes were quick and easy to make, except for pitting and chopping the cherries.  I added a handful–maybe 10 cherries?–to the following batter:

1 1/4 c flour
3 1/2 t baking powder
1 t salt
2 T sugar
1 1/4 c milk
1 t vanilla
1 egg
2 T canola oil

Mix, without overdoing it–a few clumps are ok. Add chopped cherries. Heat up a skillet over medium heat. When a bead of water dances on the surface, you’re ready. Cook a couple of minutes until browned and puffy, then flip. Let that side cook a couple of minutes and you’re good to go. Keep an eye on your skillet–mine always gets a little too warm and I have to turn it down or else I end up with brown but raw pancakes. Ick.

Maybe cherry season is coming up locally, and you can try your hand at these cakes–you won’t be sorry.  In the meantime, I’m going to try to keep from wilting and try equally hard to get some work done.  Enh!  Late July already?  Yikes, stripes!